
Modeling to Reference Images
 Collecting accurate, clear and informative reference images is, hands down, the most important part of the initial modeling stage. To be honest, I don't even start modeling anything until I know, from analyzing the reference images, how this model is supposed to look. What shape is it? How does it look from the top, or side? What color is the object? How does the light interact with this object? All of these questions, and a whole lot more, will be answered after deconstructing your reference images. In essence, we have to become mini experts on the details of our model. How are you ever going to recreate an object in 3D if you don't include reference images in to your production process.
In addition to communicating the size, scale and proportions of the object, reference photographs also illustrate surface color, material characteristics and texture detail, like the accumulation of dirt or grime. They help focus us on where to include weathering details, like scratches and rust, and tell us how this object was influenced by it's environment. Photographs provide us with a launching pad for creating diffuse texture maps for our objects as well as helping us create the form of the model.
This week we will be exploring the process 3D modeling with reference images. The goal is recreate our object right down to the last nut and bolt. Before we get started however, we must explore the process of taking reference photos and how to use them in Modo. Also, we'll examine the procedure of aligning our reference photographs to each other; an important step in the 3D modeling pipeline.


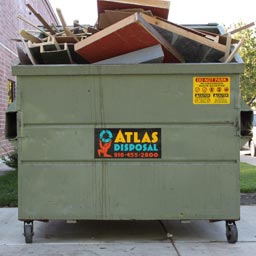
Dumpster Geo (50pts)

Project Due: Week 07
3D modeling is an art form that requires a high degree of attention to the details. Every model we create needs to be built from reference images or photographs. Using the skills we have learned thus far, build a 3D model of a photorealistic garbage dumpster. Pay particularly close attention to the size, scale and proportions of the dumpster. Accuracy is key to the success of this assignment. This will be a two-part project. In Part 1, you will build the model. Part 2, generation of the UV maps and textures will be completed. Please ensure your project includes the following required elements before you complete this assignment:
- Geometry for Dumpster (base, wheels and lid)
- UV Map for the entire Dumpster
- Polygonal Budget = 500 Polys
- Geometry for a Simple Scene
- Global Illumination = On
- Final Render Frame Size = 1280 x 720 pixels
- Final Render File Type = JPEG
Examples of Successful Projects
Check out these awesome projects! The images below are example of successful student projects. Use the following images to help guide you to your end results. Notice that all of these images include a high degree of detail on the surface of the geometry, accurate materials/textures, and stellar lighting set-ups. In addition, each of these images properly showcase the model, the focal point of the render, by utilizing a good sense of composition and framing. Great work!


All Finished with your Homework?

After you have saved the project file on your personal external storage device (like a thumb drive), please upload your Luxology Scene File (.lxo), a flattened PNG of your diffuse texture (.png) and your rendered image (.JPEG) to the Dumpster Geo dropbox on D2L.
Before you upload your files to D2L, please ensure your files meet the following naming conventions:
Submit Your Assignment- lastname_gcom_424_dumpster_geo.lxo
- lastname_gcom_424_dumpster_geo.jpeg
Alignment

Project Due: Week 07

In order to design and create modes that are, both, accurate and to scale, we must incorporate reference photographs into our 3D modeling production pipeline. After importing the photographs into Modo as backdrop images, we must properly align the photographs to each other. In this exercise, you will import the supplied reference photographs and properly align them to one another in Modo. Flush out the basic shape with the modeling tools once you have properly aligned the reference photographs. Please ensure your project includes the following required elements before you complete this assignment:
- Reference photographs properly aligned to each other
- Reference guides (planes) that prove accurate alignment between photographs
- Basic outline of the shape in 3D
All Finished with your Lab Assignment?
After you have saved the project file on your personal external storage device (like a thumb drive), please upload your your Luxology Scene File (.lxo) to the Alignment Lab dropbox on D2L.
Before you upload your files to D2L, please ensure your files meet the following naming conventions:
Submit Your Assignment- lastname_gcom_424_lab_alignment.lxo
Important Documents

Check out these awesome learning resources! I've collected a number of assets that I think will help you conquer this week's homework and laboratory assignment. Please download the following materials to your local hard disk or flash storage device (AKA thumb drive).
Videos

Here are some important videos for this week's learning materials. I've created these videos to help you navigate the instructional content we covered in class. Make sure you add these important assets into your personal learning library by bookmarking them!