Understanding UV Maps
In 3D art, great 3D models can be ruined by poor textures. Creating photo-realistic models requires some serious texture work with some serious tools. Before we can start painting our textures in Modo, or even Photoshop, we need to generate a UV map. At first, creating UV maps is a lot like pulling teeth; difficult and extremely painful. Through constant practice and guidance, however, the pain is dulled.
More often than not, UV Maps seem magically. What are they doing? How are they made? What purpose do they serve in the larger production pipeline. UV Maps, at their core, allow us to accurately place 2D texture maps on specific polygons and in very specific locations on our models. In many ways, UV Maps are a lot like the wrapping paper on a birthday present, or the pattern for a dress. We need to create a 2-dimensional version of our 3D model in order for us to be able to place the wrapping paper on the present. Check out this great video on the fundamentals of UV Mapping for the folks at CG Guerrilla:
Creating UV maps is an art form unto itself. Time, practice and a whole lot of patience is required when generating UV islands and maps. This week, we will explore the fundamental practices and procedures of creating production quality UV maps. UV maps allow us to place custom textures on specific polygons on our models. If done correctly, UV maps will ease the strain on the rest of the texturing stage and allow us to create custom texture maps for our models.
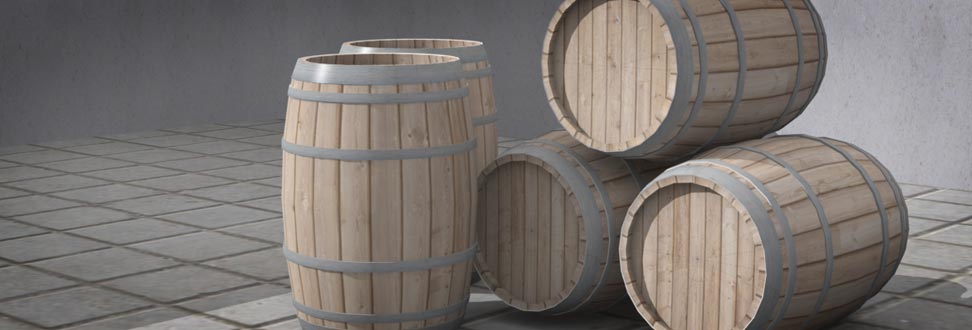
Wine Barrel - UV Maps (50pts)

Project Due: Week 04
In this exercise, you will learn the basics of creating UV maps and textures in Modo. The use of sub-division surfaces will help us achieve the level of detail we will need in order to re-create a photo-realistic render of a wine barrel. At the end of this two-part project, you will have created a high-resolution wine barrel with a UV Map and a photorealistic 2D diffuse texture map. In Part One, we'll focus on creating the Geometry and UVs and then we'll finish up the Diffuse Texture Map in Part Two of this project.
To begin Part One of this project, spend some time researching what a wine barrel looks like. Great models are created with a library of reference photos, so search the web for great reference photos of a wine barrel. Use your reference photos as backdrops items to aide in the creation of the model of your barrel. Next, start un-wrapping the geometry of your barrel and begin to generate the UV islands for your model. Take it slow, take it one surface at a time. The process of creating accurate UVs is a slow, so don't rush through this process. Utilize the videos on UV Mapping at Modopedia to help you work with the UV Mapping tools in Modo. Next week we'll focus on creating the 2D diffuse texture for our wine barrel. Please ensure your project includes the following required elements before you complete this assignment:
- Geometry for the Wine Barrel
- Geometry for a Set (scene)
- UV Map for Wine Barrel
- UV Map for Set (scene)
- Environment Preset of your choice
- Global Illumination = On
- Final Render Frame Size = 1280 x 720 pixels
- Final Render File Type = JPEG
Examples of Successful Projects
Check out these awesome projects! The images below are example of successful student projects. Use the following images to help guide you to your end results. Notice that all of these images include a high degree of detail on the surface of the geometry, accurate materials/textures, and stellar lighting set-ups. In addition, each of these images properly showcase the model, the focal point of the render, by utilizing a good sense of composition and framing. Great work!


All Finished with your Homework?

After you have saved the project file on your personal external storage device (like a thumb drive), please upload your Luxology Scene File (.lxo) and your rendered image (.JPEG) to the Wine Barrel - UV Map dropbox on D2L.
Before you upload your files to D2L, please ensure your files meet the following naming conventions:
Submit Your Assignment- lastname_gcom_424_wine_barrel_uv.lxo
- lastname_gcom_424_wine_barrel_uv.jpeg
UV Lab 01

Project Due: Week 04
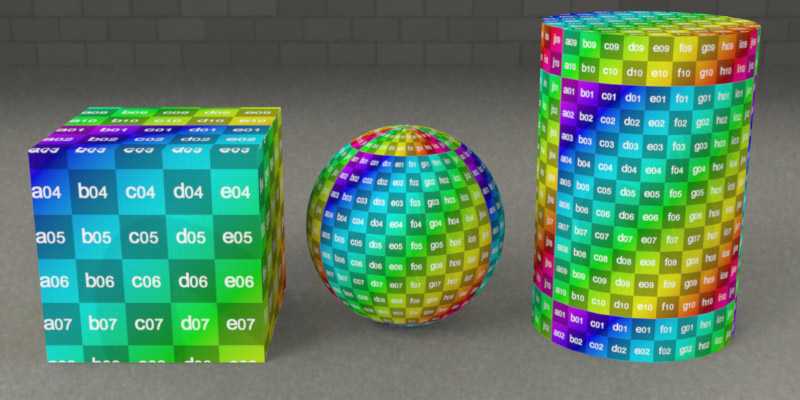
It takes a lot of experience working with the tools to generate great UV maps. Projection maps are not supported in Game Engines, so we need to get in to the habit of generating accurate UV maps. In this exercise, you will generate UV maps and custom textures for three objects. Before you start, go to the Resources Tab and download the Lab Project File. In oder for you to complete this assignment correctly, you must create UV maps for the objects found in the supplied scene file. Once you have created the UV Maps for each of these shapes, apply the UV Checker Material preset to your model. The UV Checker Preset will quickly illustrate if your UV Maps were created correctly. Use the sample images below to guide you to the final result. At the conclusion of this process, make a quick little render of your scene. Please ensure your project includes the following required elements before you complete this assignment:- UV Map - Square
- UV Map - Sphere
- UV Map - Cylinder
- UV Checker Material Preset applied to all models
All Finished with your Lab Assignment?
After you have saved the project file on your personal external storage device (like a thumb drive), please upload your Luxology Scene File (.lxo) and your rendered image (.JPEG) to the UV Lab dropbox on D2L.
Before you upload your files to D2L, please ensure your files meet the following naming conventions:
Submit Your Assignment- lastname_gcom_424_lab_uv.lxo
- lastname_gcom_424_lab_uv.jpeg
Important Documents

Check out these awesome learning resources! I've collected a number of assets that I think will help you conquer this week's homework and laboratory assignment. Please download the following materials to your local hard disk or flash storage device (AKA thumb drive).
Videos

Here are some important videos for this week's learning materials. I've created these videos to help you navigate the instructional content we covered in class. Make sure you add these important assets into your personal learning library by bookmarking them!